Showing posts with label valentine. Show all posts

Monday, February 12, 2018

Le Meow...

Hello all! It’s already Valentines week! :) I'm back again with another Valentine's Day card. I made this cute love scene card using Newton Dreams of Paris stamp set. This is such a fun set with lots of adorable and sweet images.

For this card, I stamped and colored the eiffel tower, hot air balloons, the cute Newton and his girlfriend using distress inks. To add little shine, I heat embossed the tower using clear embossing powder. Then, I cut the images using their coordinating dies from Newton Dreams of Paris Die Set. Next, I used the stitched rectangle die from Frames & Flag Die Set to create a focal panel and picked a white card stock as the base card. To create the sky background, I cut a piece of white card stock using Sky Borders Die Set and inked the background with Salty Ocean and Mustard Seed distress inks. I did the same for the base card but used only Salty Ocean distress ink.

Then, I framed the scene by adhering the images. It was the fun part of making this card. I stamped the sentiment directly onto the sky panel and added tiny heart above Newton. Finally, I mounted the entire focal panel onto a the base card using foam tape. I had so much fun coloring the images on this set and love how sweet this card turned out

Thanks again for stopping by! Happy Valentine's Day!! Love you all to the max! Have a great week with your loved ones. See you all on next Monday with another card. Hugs! :)

Sunday, February 11, 2018

You Have My Heart

Hi There! Today, I'm sharing a little action card featuring a lovely bear from MFT BB Bitty Bears stamp set. I made this card inspired by this week’s MFT Color Challenge #87. It's one of my favorite color combo. Here is my take!

First, I stamped and colored the bear with distress ink and cut it out using the coordinating die. To create the frame, I used the MFT Stitched Rectangle Scallop Frame die and inked it with Picked Raspberry distress ink. For the background, I gently inked the Staggered Heart stencil with Spun Sugar distress ink. Next, I create an ombre on a white card using Hickory Smoke and Black Soot distress ink. Then, I placed the letter dies from MFT Little Letter die set and cut out the letters. I die cut the letters again on a black card stock and adhered the ombre letters onto these black letters to give a little shadow and dimension.

Next, I stamped on the sentiment from the same stamp set and heat embossed it with clear embossing powder. I finished off the card by adding a little action wobbler on the back of the bear and placed it along with the letters to form the word 'LOVE'. That's all for this card! Hope you like it.

I'm also playing along...

Thanks for stopping by and have a great week! :)

Monday, February 5, 2018

Newton's Sweetheart

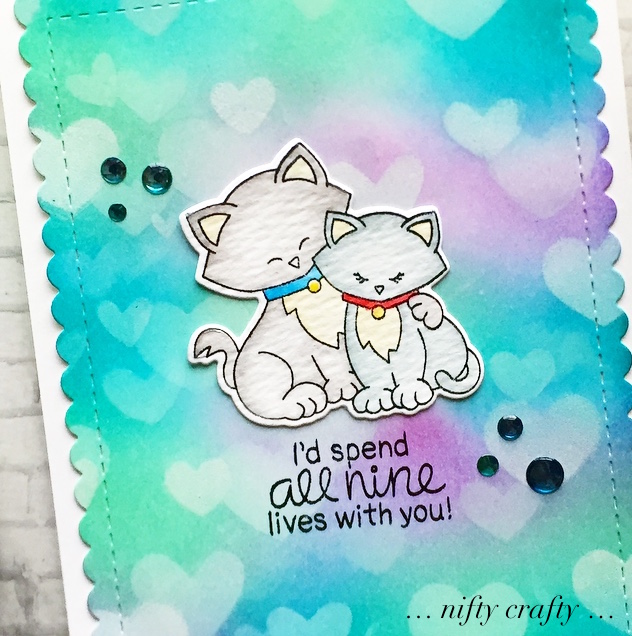
Hello there! I’m super excited to be the Newton’s Nook Guest Designer for the month of February. Huge thanks to the Newton’s Nook family for inviting me. As we are in the month of love, here I’m sharing a lovely Valentine’s Day card featuring Newton and his sweetheart from the newly released Newton’s Sweetheart stamp set. I love the images and cute sentiments on this stamp set. They are super adorable and perfect for the theme of love.

For this card, I made the background using the bokeh technique (photography term) with distress inks. I used three colors, Peacock Feathers, Cracked Pistachio and Shaded Lilac. First, I blended the distress inks using the blending tool and colored the card completely. Then, I used the Tumbling Hearts Stencil and white pigment ink to create the bokeh effects.

I gently dabbed the white ink on to the different sizes of hearts using sponge dauber. I made some lighter and blurry. I overlapped some of them and make it little darker. I did it randomly all over the card and let it dry. This is such a fun technique and I love how it turned out. Then, I cut it out with a scalloped edge die from the Frames & Flags Die Set.

Once I’m done with the background card, I stamped the image of kitties on a TimHoltz distress watercolor card stock and colored them using distress inks. I cut them out using the coordinating Newton’s Sweetheart Die Set. I adhered the image onto the background card and stamped on the sentiment from the Newton’s Sweetheart Stamp Set. Next, I adhered the final background card to the base card and finished off by adding some teal dimensional dots. That's all for today :) I hope you like this card!

Thanks for stopping by! Have a great week ahead and I’ll catch you on next Monday with another card.

Thursday, January 18, 2018

I'm here for you...

Hello! Hope you all had a great holiday. Wish you all a happy new year! :) We are blessed with a baby boy recently so I took a little break from crafting and blogging. Here I'm back with my first card for this year!

I colored the two little bears from MFT BB Bitty Bears using distress inks and cut them using coordinating die. I used the sentiment from the same stamps set. Then, I create a frame using the Stitched Rectangle Scallop Frame die from MFT. It's one of my most favorite die frame which was in my wish list for a l-o-n-g time. I just had it recently and here I'm using it for this card :)

Next, I create a rainy background by blending distress inks and splashed few drops of water. I trimmed out a yellow color side panel and used the Staggered Hearts stencil to create a background full of hearts. I picked  a similar color of distress ink to fill in the the little hearts. I love how it turned out. Looking so lovely :)

That's all for this card. Hope you like it! :)

I used the color palette from the MFT color challenge and the sketch from MFT Wednesday Sketch challenge. But, now it's too late to post this card on the sketch challenge as it was over. Anyway, I'm still in the color challenge :)

Entering my card in...

Thank you so much for stopping by! :)

Wednesday, August 16, 2017

I'm Stuck On You

Hello friends! It’s a great challenge to make a CAS + one layer card. But that’s the fun! So many ideas popped up while making this card. Well, it really didn’t take much time either. Here’s my card.

I used the colors from Color Throwdown challenge and cute cactus plants from Lawn Fawn - Stuck on You stamp set on this card. The pots and plants are stamped with the MISTI stamping tool using dye inks. It turned out so vibrant after several times stamped using MISTI. Love MISTI! :) It’s my new favorite toy!

The sentiment is from the Lawn Fawn - Stuck on You stamp set and I add the block letters from Ms.Sparkle & Co alphabet stamp set. I tied on some twine on the top of the card. Finished off by adding some dimensional dots from EK Success - Rainbow Dots.

Linking the card in the following challenges:
Thank you so much for stopping by and happy crafting! :)

Friday, July 1, 2016

Love You Floral Card

Hi There! First day of the month! I have a card to share with you all. This is a simple card using some floral stamps and most of them are from the Simon Says Stamp - Hello Friends stamp set. It's my first attempt in creating a wreath design. It took some time for me to start building the wreath using small stamps. I wanted to try something which is out of my comfort zone. So, here is my card for today. 

I stamped the images and water colored them using distress inks : Cracked Pistachio, Wilted Violet, Broken China and Shaded Lilac. I had no idea how it will turn out as I never tried water coloring on my previous cards. It's a great experience playing with distress inks and it was challenging too! More to learn :)

The sentiment was gold embossed and adhered to the center of the wreath. Overall, water coloring is therapeutic! I enjoyed making this card and love the way it turned out. Hope you like my card. I would love to hear your feedback.

I'm entering this card in the following challenges :


Thanks for stopping by and have a great day!

Tuesday, December 16, 2014

Card in a Box - We Make a Great Pair!

Hi all! I'm logging in after a long time. Let me share my recent work with you all.


This box card is one of my favorite. It was made for a lovely couple who love beach. This box can be fold and mailed easily just like any other standard greeting card. Isn't interesting? I really enjoyed decorating this box! I adhered some stamped images from Inkadinkado - Coastal Beach.

I'm entering this card in Simon Says Stamp challenge - Anything Goes

Thanks for stopping by!

Thursday, February 27, 2014

V Day Treat Box

Hi friends! Since we’re still in the month of February, I’m sharing a super easy chocolate box that I made for Valentine’s day. This box measures 1 1/8" x 3 1/2" and 1" tall . It perfectly fits six Dove chocolates. The adorable patterned paper I used for this box is from Recollections. I just love the pink and red hearts!


I'm entering my work in the following challenges: Make it Monday and The Pink Elephant. Check out my other treat boxes here!

Thanks for stopping by!
Have a nice day and keep smiling.

Easel Beach Card

Hi friends! Life is so busy being a full-time stay-at-home mom. My 2 year old has just started going to play school and other responsibilities ate up my time. I was in a very comfortable routine and couldn’t devote time to update my blog. Anyways, I’m back with another beach card requested by a customer.


This is an easel card and I've added a flip flop, quilled bucket and starfish as an embellishment. I’ve created my own waves stencil using sticky notes and inked up with distress ink. I'm entering this card in the following challenges: Make it Monday - Anything Goes and Simon Says Stamp - Anything goes with Pearls.

Thanks for stopping by!

Tuesday, July 30, 2013

I love u

Hi there! I made this card late night yesterday. So I'm here to put up this card real quick since I didn’t get time to do it yesterday. I used simple elements to embellish the card.

I always love using zig zag patterned paper and I got this one from K&Company double sided paper pad. Next to that, I took another scrap of card, created a little tab with it, and placed three tiny hearts. Then I added few strawberries on top of a paper thread and placed it just below the sentiment. The sentiment stamp was something that I had in my stash. I thought it coordinated perfectly so I used it for this card. The grass effect on the bottom of the card was created using Fiskars scallop border punch. It's a cool trick! I added some glossy accents to the tiny hearts and strawberries for some added shine. To finish off, I drew stitch lines around the tab and sentiment.

I'm submitting this card to the Simon Says Stamp challenge: Summer, Food and Drink. I adore Simon Says Stamp sets but unfortunately I don't own any yet! I hope and love to add one of those to my collection very soon. Be sure to check them all out over on the Simon Says Stamp store.

That's all for now, but I'll be back shortly :) Thank you so much for stopping by.

Sunday, May 5, 2013

Be Mine

Hi! Hope everyone had a great weekend! I had a nice weekend :) Here is my take on this weekFreshly Made Sketcheschallenge by Linda Suarez. I felt I could have done a much better design than this... but I was a little short on time to do my craft work this week (thanks to my little one!). So, I decided to do a simple layering technique using some pattern papers for my card.


To start of with, I chose a textured card base in yellow and to layer the card I have used some contrasting pattern papers. Then I punched three different sizes of hearts out of polka dot patterned papers and used them as an embellishment. These heart shape punches are my favourite and most often used on my cards. They are super cute and neat!

I love this sentiment as the font type looks kinda funky... isn't it? I really enjoyed layering these pretty pattern papers on my card. I designed the inside card using the same pattern papers... it's exactly the same as the front design but without the sentiment.

Hope you enjoyed and thanks for stopping by!

Monday, March 11, 2013

I Love U

Hello all! Hope you all had a great weekend. Here is the card for this week Freshly Made Sketches by Linda Suarez. I really missed their past challenges. Love the new look of their blog. Well, I thought of making a simple and neat card for this week's sketch.

I'm amazed looking at all the other gorgeous creations. Don't miss it! Thanks for stopping by.

Sunday, February 12, 2012

Love Note Cards

Back again with lovely cards for the valentine's day! These mini cards have a lovely little heart stamped on a circle scalloped card and suitable for any kind of message. For e.g. I love you, be my valentine, valentine 'thank you' or could be a great love note to accompany gifts!


Hope you enjoy! Thanks for stopping by.

Saturday, February 11, 2012

I'm Nuts About You!

Hello everyone! Here is another cutie valentine's day card. This cute little guy looks adorable holding a nut with a small heart shape on it...and saying "I'm nuts about you!". This is a set of 5 cards measuring 3"x3" would be great as valentine note. I colored the little heart using the pink gel pen. I also added four tiny crystal gemstone on each corner of the square scalloped card.


Thanks and look for more!

Wednesday, February 8, 2012

Five Mini Valentine

Hello! I am more into doing simple mini note cards these days...and these simple note cards here are an example of what I love doing lately, specially for the valentine's day. I made this set of five 3"x 3" mini valentine card using kraft cardstock along with a white circle scalloped cardstock. Each card is embellished with a teeny tiny glossy heart...just a symbolic way to convey your love to your special someone. The cards are blank inside and each card comes with a white handmade envelope. Grab these cuties!


Thanks for viewing!

Tuesday, February 7, 2012

To My Love!

Hi there! Here is another creation from the beach theme for the month of love. Yes! It's a valentine card. I received an order request from a customer who wished for a beach theme valentine card. I have to say that 'beach theme' has become one of my favorite themes. The reason is because I get the chance to include some quilled decorations as a part of the card design.This time, I chose to make a simple step card...It's pretty easy to make the card base and I got the idea from here!
Side view
My previous beach cards have the quilled coconut tree, clouds and sun...so I decided not to repeat the same thing for this card. Hence, I made a colorful quilled beach umbrella in this card. If you notice closely, most of my cards will have at least one element using the red, green, blue and yellow combination. :) I enjoy making them that way!
Front view
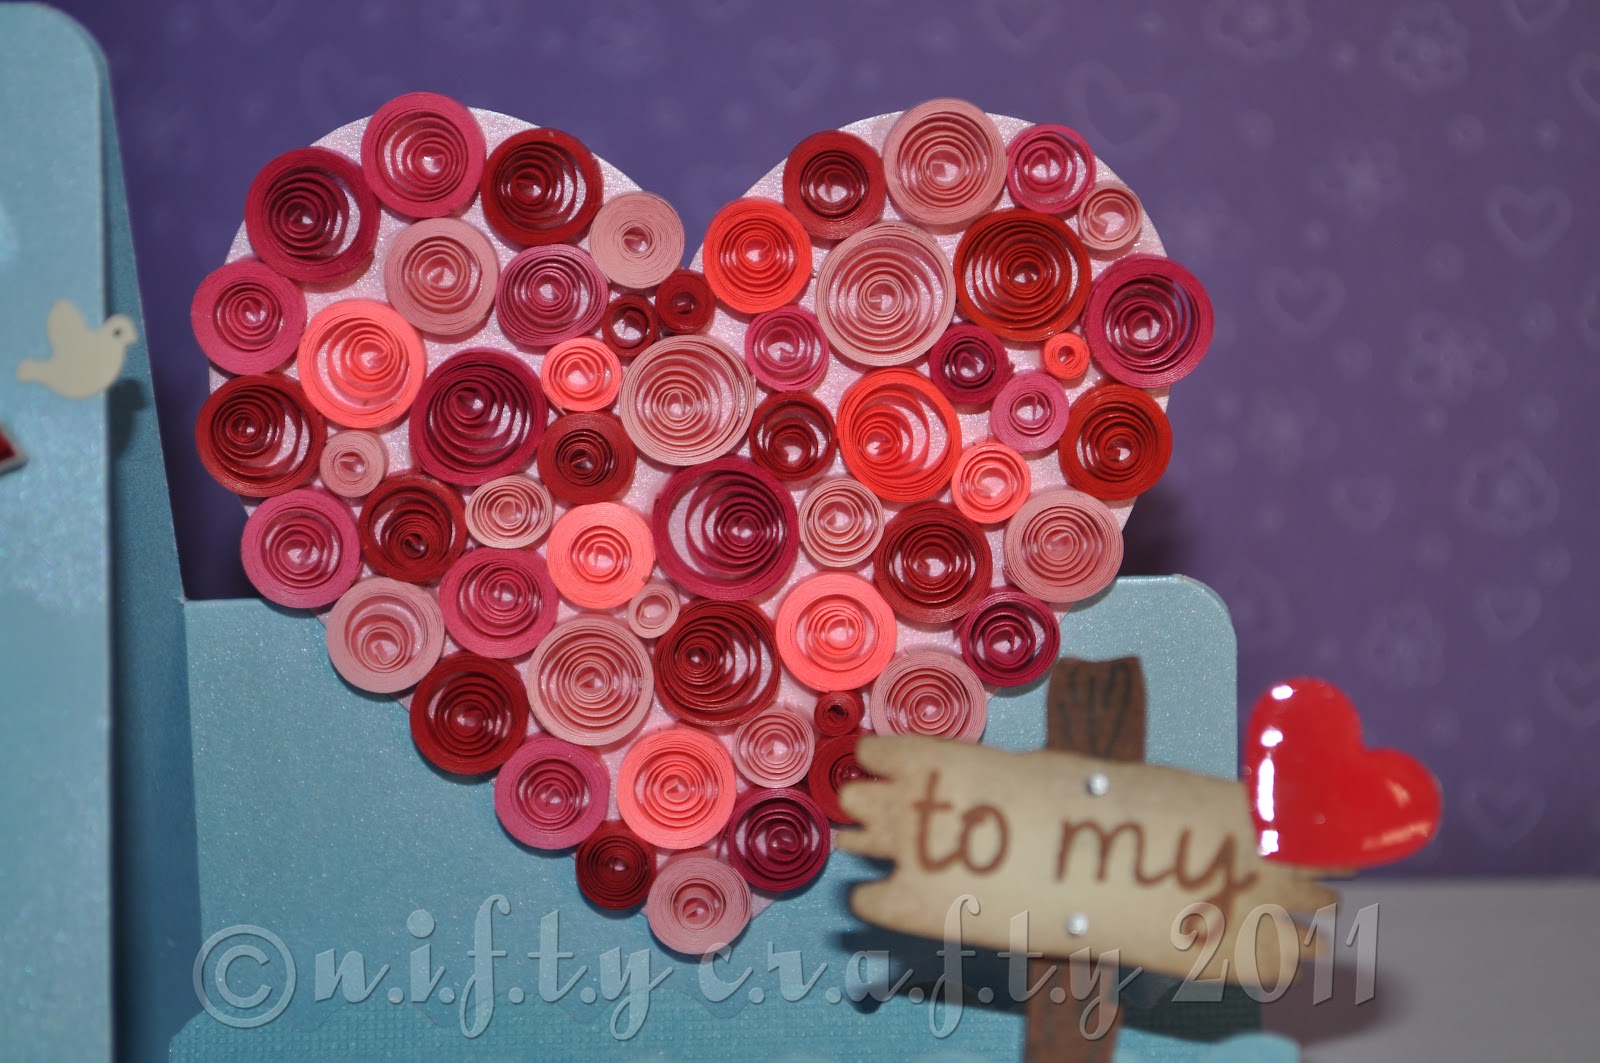
A valentine card obviously should have the heart shape. Here, I have used different sizes of tight coils to make a quilled heart! I used the pink and red shades as I like the idea of seeing those colors combined in this design. I love the way it turned out!
Chubby heart!

I made a wooden beach sign to stamp the "to my" wordings and placed a tiny heart beside it to read as "to my love". I added some glossy accent to the cute heart to make it more dimensional and shiny. Here is the closer look!
Wooden beach sign
Enjoy! If you like this card...do share this post with your friends!

Thanks for stopping by :)