Showing posts with label flower. Show all posts

Tuesday, March 27, 2018

Feel Better Soon

Hi There! I've been little busy setting up new routine with my little one and also took some time (days :P) to clean up my workspace. I'm glad to be back again with this floral card which I made for the Altenew - March 2018 Inspiration Challenge. This is my first time taking part in Altenew challenge. I've fell in love with the color choice by Virginia with the beautiful click from her recent trip. Here is my take!

I used Altenew - Floral Motif stamps set for this card along with some distress inks. I used masking technique to create the layers of flower and leaves. I stamped and heat embossed the images with gold embossing powder and colored them with distress inks. Next, I used the MFT Wonky Stitched Frame die to cut out the panel and adhered it on a kraft base card.

I stamped the sentiment on a black card stripe and heat embossed it with gold embossing powder and layered it on a kraft card stripe. I finished off the card by adhering the sentiment using foam adhesive. Coloring flowers has been always a great challenge for me. I'm so happy to achieve something out of my comfort zone and I love how this card has turned out. Hope you like it! :)

I’m also entering this card into the following challenges...
Simon Says Wednesday Challenge - Floral Frenzy
HLS March Watercolour Challenge

Thanks for stopping by! I hope to have productive crafty days! 😌
Hugs! :)
Valliam


Friday, March 7, 2014

Floral Birthday Card

Hi friends! It feels good to get back into card making. I've been craving to do a card and I finally had a chance to make one last night for my friend’s daughter. She is turning five next week and she loves anything that is in pink or purple color. To make this card, I was inspired by the sketch at Seize the Sketch this week. So here is my take...
 

I made this card using papers from the American Crafts double sided paper pad. It’s a 6x6 pad with 24 bright and colorful papers which I think is perfect for birthday cards. The vibrant flower is from Recollections - Floral stickers and the leaves are hand stamped using Recollections mini rubber stamp set. I heat embossed the leaves and colored them. I love the little birdie from Hero Arts Fanciful Swirls clear stamps set. I colored it with Colorbox inks using aqua brush pen.


Thanks for stopping by! :)

Supplies:

Sunday, August 25, 2013

You're Some Kind of Wonderful

Hi everyone!! It's weekend and finally I had time to make a card. Here is my entry for this week Freshly Made Sketches. They are celebrating their 100th sketch and I'm so happy to participate in this week challenge. It's so exciting to play with their very first sketch and a big thanks to Cindy for choosing this sketch! The color inspiration for this card came from Color Throwdown challenge.

Okie! That's all for today. Have a great week ahead!

Saturday, July 20, 2013

Best Wishes

I hope everyone having a great weekend. Last night, I made this Best Wishes card using this week's Freshly Made Sketches sketch and the colors from Color Throwdown challenge: Tempting Turquoise, Kiwi Kiss, Pacific Point, Chocolate Chip and White. These colors are perfect for summer! I've made quite a lot of beach card. So, I've decided to make a simple greeting card this time. I got everything from a single pattern paper. It's actually a double sided paper from K&Company. The patterned paper and base card are edged in Chestnut Roan Chalk ink. I added a little ribbon and its done.

Thanks for stopping by!

Friday, June 28, 2013

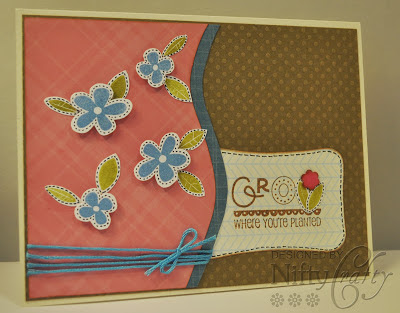
Grow Where You're Planted

Hi everyone! :) I made a card with the sketch from Freshly Made Sketches this week. The first thing that popped into my mind when I saw this sketch was the Yin-Yang symbol! It's a totally different sketch by Jennifer Brum. Anyways, my idea was to try some soft colors for the card. Thus, I used a lovely color combination from Color Throwdown challenge this week : Crumb Cake, Very Vanilla, Pretty In Pink and Cool Caribbean. This is the first time I'm entering a color challenge. Do check out their fabulous creations!

I bought some cute tag paper pads from Michaels recently and I picked a lighter color tag to stamp on the sentiment. I love the sentiment "Grow where you're planted" and decided to use it for this card.  I embossed the flowers, leaves and the sentiment with clear embossing powder. I couldn't resist doing some faux stitching around the images as well as the tag! I finished off the card with a thread around the pink patterned paper and tied a little bow. That's all!

Enjoy your weekend and thanks for stopping by!

Wednesday, June 19, 2013

Happy Birthday

Hi there! I'm enjoying taking part in challenges that helps me to stay creative and productive :) I feel so happy to play along with Friday Mashup challenge this week. This is my first time participating in the mashup challenge. The challenge is to create a project using the sketch, or using the "brick wall" technique or mash it up and create a project using the sketch and brick wall technique. The brick wall technique is something that I've never tried before. So, I decided to give it a try.


It's time to relax! :) Thanks for stopping by!

Friday, March 22, 2013

Smile Card

Hello! Again popping in to post a card that I made for this week Freshly Made Sketches by Jen Mitchell. It was quite a challenging sketch... I planned something and ended up with this Smile card.


I tried to keep it simple with the white polka dots base card. I have had some paper flowers that I made months ago and decided to use one of them to embellish this card. The sentiment is embossed with clear embossing powder.

Thank you and have a great weekend!

Monday, March 11, 2013

Thinking of You

While browsing one of my fav crafter's blog, I came across this challenge on the CAS(E) this Sketch. It was so inspiring to see loads of fun and creative samples by the the designers. Seriously, I couldn't take my eyes off them, they were all so beautiful! So, I decided to join the fun and play along with the challenge. So here is a quick "Thinking of you" card for this week sketch!

Thank you and do check out their blog!

Thursday, April 19, 2012

Miss You!

Hello! I am back with another card for this week Freshly Made Sketches by Rita WrightIt's a wonderful blog with extremely talented ladies on board, and I am really happy participating in their sketch challenge every week. I am inspired by all the other beautiful entries. Such a great site!

Here is my take on this week's sketch!


I am glad to make this card because it's little different from the usual card that I make. Yes, I have added some paper roses to create some 3D effect :) This is the first time I ever made roses using paper and I guess it turned out well! I used to make roses out of ribbons during my school days. I was so excited to make one after a long time. Well, for this card, I heat embossed the roses with white glitter powder to make it little shiny over the petals. The rest of the stuff are pretty simple - "Miss You" sentiment, two gold brads on the corners, and lovely swirls to finished off the card. 
Closer View
Hope you like it and thanks for stopping by! :)

Friday, April 13, 2012

Easy Daisy Thank You

Hey guys! This is my second post in Freshly Made Sketches. Well, I missed the last two sketches from FMS. I am super busy these days. It's hard to find time for my craft work. Anyways, I made this card for this week's sketch by Tui Nathan. I've to brief a little bit about this card as I used some of my favorite embellishments to make it.


I made some paper daisies last month which I thought would be perfect for dressing up cards. So, I used one of that to embellish the card :) and I'm crazy for swirls! Hence, I glued some paper swirls on two sides of the flower. Ribbons are my favorite piece of embellishment. But I get bored of using them just to tie bows. Here, I cut the ribbon into short pieces (about 2"), glued both ends together and nicely attached the ribbons to the side of the circle card. Then, I stamped on the "Thank You" sentiment to finished off the card.

Thanks for stopping by and have a great weekend! :)

Monday, February 13, 2012

Baby Shower Thank You Note Cards

Another day, another 8 mini cards are made! For these mini "Thank You" cards, I used white polka dots card as the base. I love to make cards using polka dots pattern card as it has a fine embossed impression. I made these cards for the baby shower occasion. So, thank your guest for welcoming your sweet baby into the world with these little flowery thank you note cards.


Thanks for stopping by!

Wednesday, January 25, 2012

Tri-fold Birthday Card!

Hello! I came across this super easy folded card idea from Kristina's Friday Focus series. I couldn't resist and made this flowery trifold birthday card for my dear friend. Here it is!
Front view
Inside view - second fold
Inside view
I love the faux stitching technique used by Kristina...It gives a nice finish to the card! :)
Take care and more later!

Monday, June 13, 2011

Dora's Birthday Wish

Hi there...hope you all had a great weekend! I recently have been working on this easel card (like a tabletop frame) for one of my friend's lovely little niece. Actually, it was for her niece's second belated birthday...and therefore my friend thought it would be nice to have her niece's name on the birthday card instead of any wishes. I was told that her niece loves Dora - role model of every little girls...
Side View
Front View
Inside View
So, here I made this colorful flowery background card for the little girl...My idea was to make her feel happy by looking at the character Dora...standing in a garden and calling out her name to wish happy birthday! Since my friend insisted not to include any wishes on the card I simply placed two birthday candles inside the card. This card is one of my favorites :) It was easy to make one...simple and looks unique too. Another way of making this card is to include your favorite pictures or photos.

Thanks for stopping by!

Sunday, June 12, 2011

Hello Little One!

Here's a lovely card to welcome a beautiful baby girl to the world! I truly enjoyed making this card for my dear friend. She has requested a warm welcome card for her newborn niece...Well, I have tried some new things here...
Front View - Personalized with baby's name
I picked ivory color for the card base, and layered Swiss dot card with another layer of adorable pink patterned card and formed the base design. The metallic pink scallop circle holds the message "Hello Little One" with coordinating handmade prima flowers. The bottom of the front design has the baby's name personalized using hand-stamped alphabet stamps.
Inside View - Handmade baby stroller
A handmade baby stroller has been used to decorate the inside of the card. Since I used the same set of cards to make the baby stroller...I decided to place it inside. The fun part was putting them together...and the challenging part was assembling the bits and pieces!
Hello little one...a closer look~
I love making my own embellishments...especially  flowers of all kinds, tiny objects such as the baby stroller on this card, the little car which I made for the father's day card and other quilling decorations. It was my very first try at making prima flowers using a simple embossing technique. I was pretty happy to see at the outcome as it feels so real to touch....and I can't wait to try out more of these using different colors and sizes of petals. Look for more on my upcoming posts. 

Thanks!

Wednesday, May 25, 2011

Quilled Thank You

Here comes a lovely way to show someone your appreciation and gratitude... I believe, a handmade thank you card adds special essence to it! Thank your family and friends for the unexpected wonderful things that they have done in your life by having this lovely quilled thank you card!

Friday, May 13, 2011

For Her...

Every woman loves to receive flowers on their special day since flowers are one of the most prettiest and beautiful creation of God. Including flowers in your gift is an ideal way to make them feel special and loved. So here, I made a floral designed birthday greeting card - perfect for mom, daughter, sister, co-worker, special friend or anyone who adores flowers!
Tiny flowers and stems
I have created three pretty flowers (combination of gold and ivory colors) and embellished with a gold brad on each of the flowers. The stems were made of a strand of brown paper raffia which I saved from trash. :P The end of each paper raffia was tightly twisted and glued on a curvy cornered red card. The other ends were also well glued to hold the flowers firmly.
Finished Card
I often use ribbons on my handmade cards as it enhances the design beautifully. In this card, the flower bouquet is nicely placed over a gold ribbon which also can be treated as a grand base for the flower spreads. The flowers are mounted on an ivory color card which has a decorative border. This design suits for any kind of greetings such as "Thank You", "Congratulations", "Best Wishes", or "On Your Special Day". Here I stamped a simple "Happy Birthday" greeting.

So, come on and make your choice! Make her feel elevated and convey your thoughtfulness by sending this sincerely made card.