Showing posts with label quilling. Show all posts

Thursday, February 27, 2014

Easel Beach Card

Hi friends! Life is so busy being a full-time stay-at-home mom. My 2 year old has just started going to play school and other responsibilities ate up my time. I was in a very comfortable routine and couldn’t devote time to update my blog. Anyways, I’m back with another beach card requested by a customer.


This is an easel card and I've added a flip flop, quilled bucket and starfish as an embellishment. I’ve created my own waves stencil using sticky notes and inked up with distress ink. I'm entering this card in the following challenges: Make it Monday - Anything Goes and Simon Says Stamp - Anything goes with Pearls.

Thanks for stopping by!

Sunday, August 25, 2013

You're Some Kind of Wonderful

Hi everyone!! It's weekend and finally I had time to make a card. Here is my entry for this week Freshly Made Sketches. They are celebrating their 100th sketch and I'm so happy to participate in this week challenge. It's so exciting to play with their very first sketch and a big thanks to Cindy for choosing this sketch! The color inspiration for this card came from Color Throwdown challenge.

Okie! That's all for today. Have a great week ahead!

Saturday, August 10, 2013

Get Well

Hi! I made this card today to get some creative mojo flowing. It's been a while since I touched my quilling kit. I was little confused whether to use quilled elements or buttons... but for some reason I ended up using both. It's not exactly what I had pictured in my head. Well, this sometimes happens! The reason is because I desperately wanted to use the leaf stamp because it's just so cute. So, I used buttons to pop out like flower buds and stamped the flower image on the background. Then I made a small quilled butterfly and attached above the sentiment. Little messed up though! But, I'm still happy with what I have done :) I used Freshly Made Sketches sketch and the colors from the Color Throwdown challenge. Here is my card!

Thanks for stopping by!

Monday, April 22, 2013

Welcome Little One

Phew! It was a crazy busy week. I made this pretty baby card for a friend of mine who has given birth to a beautiful baby girl recently. I've been waiting to use some of my favourite polka dot patterned papers and here is my attempt for this week Freshly Made Sketches by Jennifer Brum. I'm so pleased with how this card turned out.

Thanks for stopping by! :)

Friday, April 13, 2012

Easy Daisy Thank You

Hey guys! This is my second post in Freshly Made Sketches. Well, I missed the last two sketches from FMS. I am super busy these days. It's hard to find time for my craft work. Anyways, I made this card for this week's sketch by Tui Nathan. I've to brief a little bit about this card as I used some of my favorite embellishments to make it.


I made some paper daisies last month which I thought would be perfect for dressing up cards. So, I used one of that to embellish the card :) and I'm crazy for swirls! Hence, I glued some paper swirls on two sides of the flower. Ribbons are my favorite piece of embellishment. But I get bored of using them just to tie bows. Here, I cut the ribbon into short pieces (about 2"), glued both ends together and nicely attached the ribbons to the side of the circle card. Then, I stamped on the "Thank You" sentiment to finished off the card.

Thanks for stopping by and have a great weekend! :)

Tuesday, February 7, 2012

To My Love!

Hi there! Here is another creation from the beach theme for the month of love. Yes! It's a valentine card. I received an order request from a customer who wished for a beach theme valentine card. I have to say that 'beach theme' has become one of my favorite themes. The reason is because I get the chance to include some quilled decorations as a part of the card design.This time, I chose to make a simple step card...It's pretty easy to make the card base and I got the idea from here!
Side view
My previous beach cards have the quilled coconut tree, clouds and sun...so I decided not to repeat the same thing for this card. Hence, I made a colorful quilled beach umbrella in this card. If you notice closely, most of my cards will have at least one element using the red, green, blue and yellow combination. :) I enjoy making them that way!
Front view
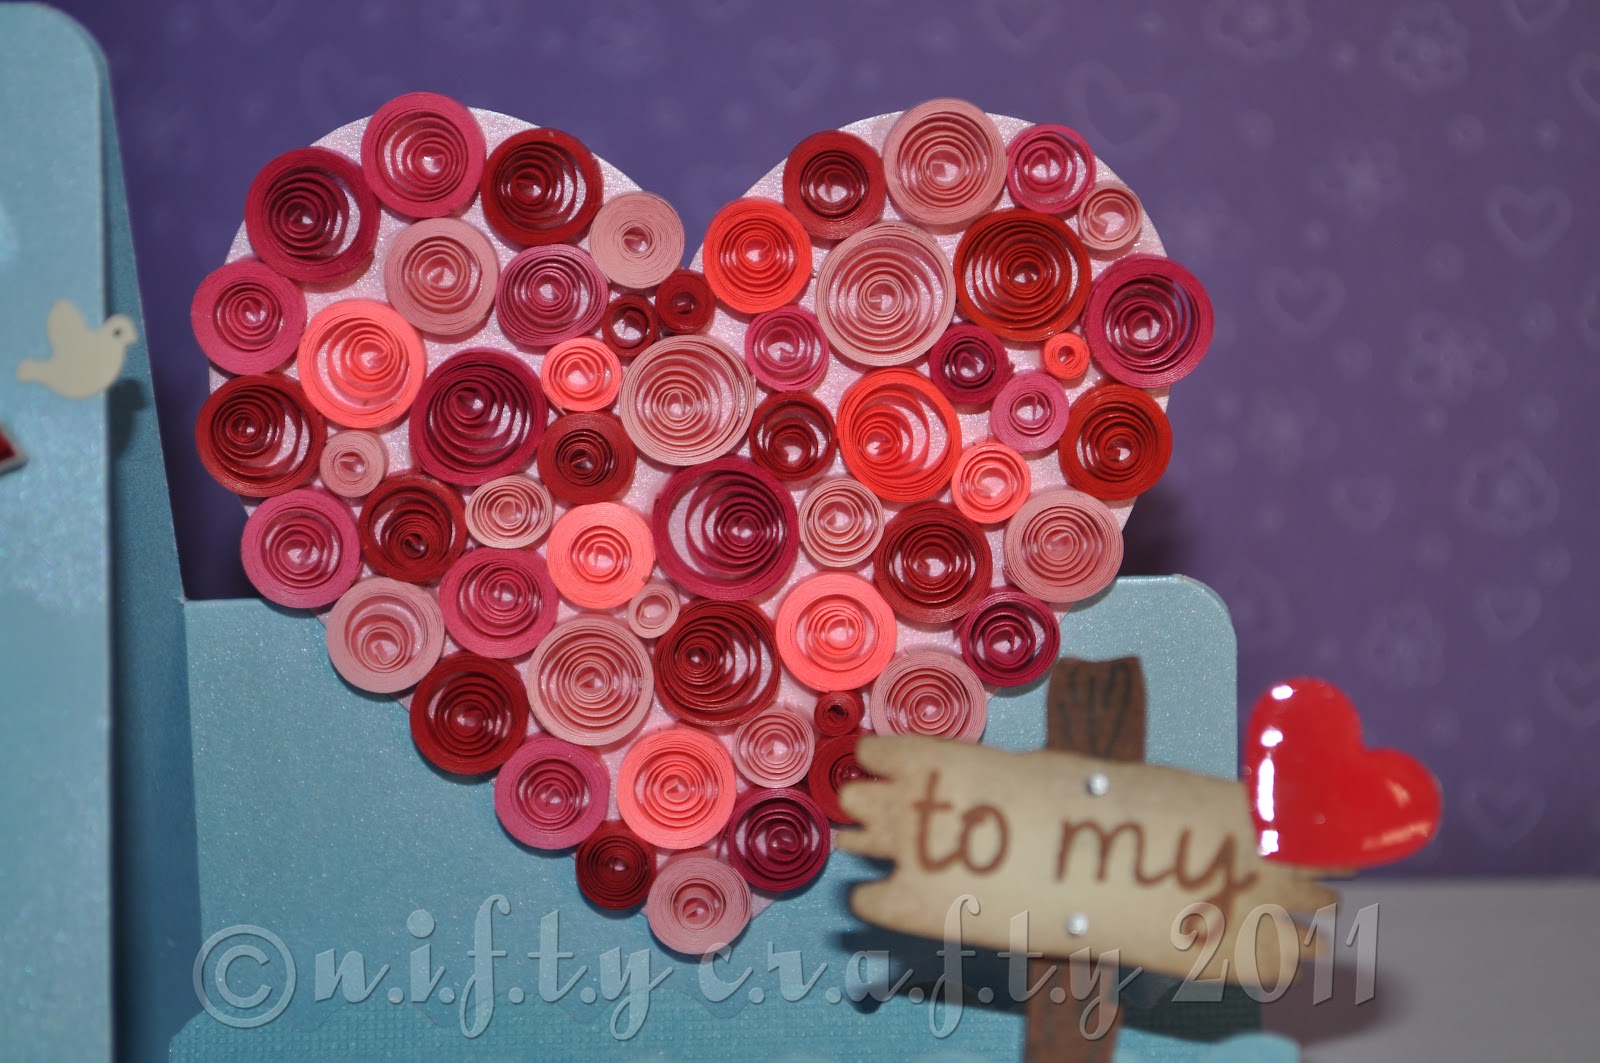
A valentine card obviously should have the heart shape. Here, I have used different sizes of tight coils to make a quilled heart! I used the pink and red shades as I like the idea of seeing those colors combined in this design. I love the way it turned out!
Chubby heart!

I made a wooden beach sign to stamp the "to my" wordings and placed a tiny heart beside it to read as "to my love". I added some glossy accent to the cute heart to make it more dimensional and shiny. Here is the closer look!
Wooden beach sign
Enjoy! If you like this card...do share this post with your friends!

Thanks for stopping by :)

Friday, October 7, 2011

Anniversary - Love you!

Hello everyone...it's good to be back to Nifty Crafty after quite a long rest. A lot of cards to make!...keeping my spirit high... step by step will get them done!

Here I made another beach and diving themed card for a lovely couple for their wedding anniversary. A simple modification of the previous beach themed anniversary card which was made for a friend of mine. It was quite challenging for me to modify the card in the first place. But with a proper sketch and many try outs...I finally finished off this card happily.
The card with it's envelope
Front View
The front of the card shows the "Happy Anniversary" greeting being held by the divers. This horizontally folded card perfectly fits two divers along with the coconut tree, cloud and striking sun which were made using quilling technique. It was pretty interesting to sketch and cut out the bits and parts of the diver images.
Inside View
The inside card was something I loved the most! A "Love you" sentiment which was stamped and embossed led me to emboss the hearts shaped stamp...which happened to go well with the sentiment. How nice to have the embossed and glossy effect on the card! I really like how it turned out...I hope the couple will like my work...wish them a wonderful happy wedding anniversary!

Thanks for visiting Nifty Crafty and for any comments that you leave.

Saturday, May 28, 2011

Beach Themed Anniversary

My latest craft work is this adorable beach themed anniversary greeting card made for a dear friend on request…for her upcoming wedding anniversary. She has made a special request to surprise her husband with a beach theme card as he loves beach vacations. So…a chill and romantic beach leisure view has been placed on a metallic blue color stock card and stamped with a "Happy Anniversary" greeting on top of the card. It comes along with a lovely handmade envelope.
 
Front View
Side View
I have tried my best to add the special touch…I really had loads of fun while making this custom made card…I hope my friend likes it…Wish the couple a wonderful wedding anniversary :)

Wednesday, May 25, 2011

Quilled Thank You

Here comes a lovely way to show someone your appreciation and gratitude... I believe, a handmade thank you card adds special essence to it! Thank your family and friends for the unexpected wonderful things that they have done in your life by having this lovely quilled thank you card!

Tuesday, May 10, 2011

Anniversary Gift

Time for more strips and coils! I was very much excited to make a wonderful gift for one of my friends wedding anniversary. It was their first wedding anniversary…and they both love pets…So, I thought it would be great to create a small animal or bird themed gift for them. Instead of googling, I bought a quilling book titled Twirled Paper by Jacqueline Lee which includes the kit. Yay! now I have a proper twirling wand, paper strips in different colors, glue and cute goggly eyes! Okie, let's come to the making…

(1) A twirly bird
It may look simple and I felt not much twirling work involved…but it took me hours to get those funky feathers! Gluing the bitty bits was the toughest part while making the bird. Overall, it was fun working on its curly tails and colorful feathers!

(2) Spotted butterfly  
This lovely butterfly was the most easiest I would say. At first, I thought its going to be difficult to get the exact size of upper and lower wings…but I was wrong…I made it within an hour! The antennae alone took about five to ten minutes…

(3) Peacock  
This guy is tough! It was challenging to get it done as the peacock's feathers was made with loose curls and it took some time to glue the feathers together in bunches. Next on the list was, the leg and feet with bent knees and "S" shaped neck. Oh not forgetting, the top knot…it was made with just half a inch of strip.
Bird + Butterfly + Peacock = A lightweight wall hanging! 
I'm glad that the couple loved my gift :))

Blooming Fan!

My first quilling experience has given me the confidence to try out more, much better and greater than the first one. The ingredient is - experiment! I did a bunch of search in Google and found out the advanced techniques of quilling. Gosh...! they have something called quilling kit! It has a slotted tool, designer board, quilling cork board, paper strips, and more... sounds great! but I was just a beginner and not afford to buy those stuff at that time. I thought, alright! I better stick to my tools and try something with what I have. Actually, I wanted to create something bigger, bright and colorful! So, my second attempt was a paper quilled fan!


My idea was to create a fan that can be lifted and stand...but it was pretty difficult to glue it with a sturdy base...so I glued them on a piece of black cardboard. Oh wait...I didn't let my work unframed! I chose a nice frame style that goes well with the bright colors and give it to my parents as a gift! :)

Monday, May 9, 2011

Passion towards Quilling

Few years back, when I was studying in Singapore, I used to spend my spare time in the library...flipping some craft books, comics etc. One day, I came across a quilling book (can't recall the title) and amazed looking at the decorative artwork...how simple it is! with just simple paper strips rolled and shaped..you can make almost anything! flowers, alphabets, animal, tiny bugs, even aliens! woah ~ like a wonderland! That was the moment where I started to look deep into arts and craftwork. Quilling involves simple technique but you need A LOT of patience! even if you want to make a small swirl! Well, this is what I have tried after getting some intro to the art of quilling. 

I made my own paper strips (tiring task) and came out with the above result! A butterfly on a Compact Disc :)